Entries Tagged 'Arts and Crafts' ↓
February 8th, 2012 — Arts and Crafts, Domestic Goddess, Gifts, Kids, Stationary

If your a parent who finds it extremely difficult to part ways with your children’s art work here’s a creative way to save it. Whether it’s your child’s wobbly handwriting or a darling drawing (Jigsaw Graphics can work with most images) this is fantastic idea for personalized thank-you notes. All you need to do is scan or photograph the artwork and email it and they letterpress your child’s designs. Allow 3-5 weeks for creation and delivery. The size of these note cards is 5.5″ x 4.25.” 30 Cards for $79.00.
www.jigsawgraphics.com
October 26th, 2011 — Arts and Crafts, Halloween

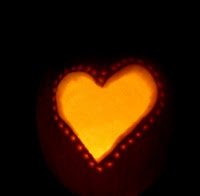
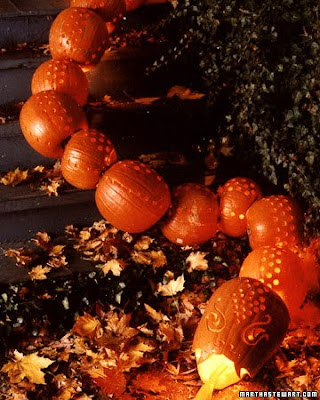
For THE WIFE’s article on Keeping Carved Pumpkins Fresh Click HERE
Image: Martha Stewart
July 29th, 2011 — Arts and Crafts, Beauty, Domestic Goddess
April 8th, 2011 — Arts and Crafts, Domestic Goddess

If your a wife on the West side there’s no doubt your a regular at The Brentwood Country Mart and have passed by Botany’s Fragrant Floral Displays. Not only does the flower and gift shop make striking arrangements for every occasion but have now opened a Flower School. Sip Champagne and enjoy Hors d’oeuvres while learning the basic art of floral arranging. Each Student will leave with a beautiful floral arrangement. Every wife should know how to arrange flowers in her home, So sign up Now as class space is limited. Next Class is Scheduled for April 13th at 5:00pm - Taryn Cox for THE WIFE

February 11th, 2011 — Arts and Crafts, Valentine's Day


Idea and Images from: Twig and Thistle.Com
www.TwigandThistle.Com
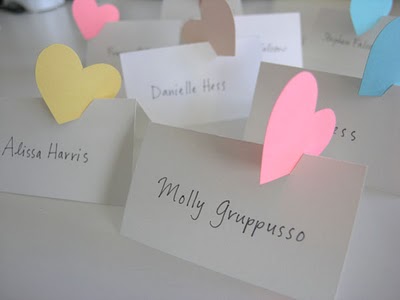
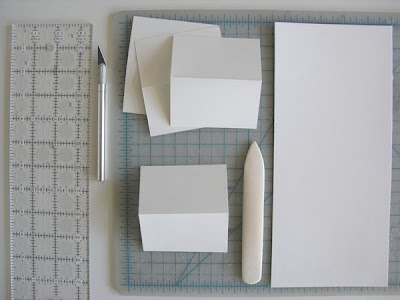
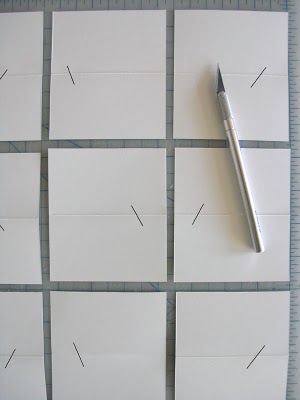
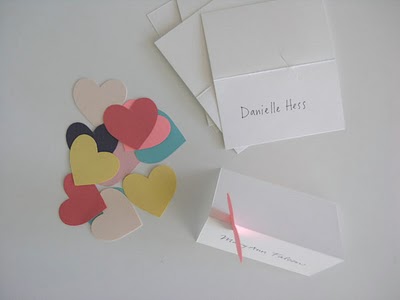
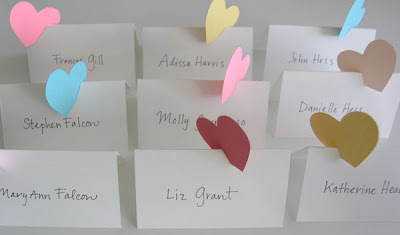
January 26th, 2011 — Arts and Crafts, Valentine's Day

Dressed for the occasion, these cards are great for dealing to friends en masse. Write the greetings on glassine envelopes with a no-smudge marker, or print them according to the following directions.
How-To
There are 13 hearts in every deck of cards, so you may need multiple decks, depending on the desired number of valentines. Test the first round of printed envelopes before proceeding; in some cases, smudging may occur. If it does, vellum envelopes might be a good alternative. Or try a laser printer if you used an ink-jet one before.
1. Using a word-processing program, type 4 messages; size each to fit onto a glassine envelope, and stagger them a few inches apart on the page. Print onto a sheet of 8 1/2-by-11-inch paper.
2. On the printout, center 1 envelope over each message. Using removable tape, affix the top and bottom edges of each envelope to printout.
3. Using the manual feed on your printer, insert envelope-taped printout, and reprint. Remove tape. Repeat steps 1 to 3 to make additional envelopes as needed.
4. Insert 1 playing card into each envelope, and seal with a heart sticker.
Read more at Marthastewart.com:
Playing-Card Valentines - Martha Stewart Holidays
January 6th, 2011 — Arts and Crafts, Babies, Kids, Travel

AN INTERNATIONAL WEBSITE FOR MODERN MUMS
Babyccino Kids is updated daily with new craft projects, favourite recipes, interesting cultural topics and other kid-friendly ideas. We also dig up the coolest new products and must-have accessories (which are always personally tested beforehand to ensure they deserve our trusted approval)!
Babyccino Kids was started by four mums who originally all met in London shortly after the birth of their first children. In 2007 they all moved to different corners of Europe and then started Babyccino Kids as a way of staying in touch, exchanging stories, ideas and tips.
They have since added contributors from New York, Sydney, Melbourne, London and Los Angeles with high hopes of discovering more great products and becoming familiar with new cities around the world.

A SERIES OF HIP TRAVEL GUIDES BY LOCAL MUMS IN THE KNOW
With insider tips and reviews from each city we offer up the best of our cities’ family-friendly restaurants, shops and activities. We’ve assembled it all into a series of travel guides (currently London, Paris, Amsterdam and New York). Our aim is to go beyond the obvious, to provide kid-friendly guides which allow parents to visit our cities in style. Please visit the Babyccino Kids Guides for details.

www.BabyccinoKids.Com
January 5th, 2011 — Activities, Arts and Crafts, Kids, Resturants


Everyday I receive countless emails, flyers and the like devoted to nothing but things for kids to do in New York City. I have been to the cat circus, a bubble extravaganza, a number of “favorite tv character” come to life revues and anything within a ten mile radius that you can put a li’l in front of. All well intentioned, some entertaining, a few just plain out there. I realized that all this activity was a search to connect with my kids and maybe that was simpler than I realized. Our best moments always seemed borne of slowing down, of interaction, of noticing them.
Moomah was created to give parents, children and caregivers that opportunity. We wanted the space to be inviting and to nurture creative stimulation not over-stimulation. The color palette was inspired by nature and the seasons. You won’t find wacky clowns with oversized eyes and primary colors and you won’t be forced to listen to “kids music”. Moomah is a space where both parents and kids can bond over a great song, a fun project or new treat. A place where you can just be together.

It’s time, finally, to pause, slow down and lower the volume. And remember that in a quiet moment, a child can discover a world of delight. It’s in your smile, a word of praise, a quirky little rhyme, a silly song, their own personal fairy tale. At Moomah our serene space, the music we play, our games and classes, the food we prepare, indeed everything we do is designed to bring you and your child closer together. To encourage conversation, reflection, sharing and careful attention. And to understand that years from now, you will cherish this intimate moment.

Toys and craft kits, all informed by the palette of patterns, forms, hues and elements found in nature, will delight and intrigue them. Exploring earth-born objects – pebbles, feathers, seashells, wool, tree bark, sand – they’ll question the why and how and where did they come from, learning of an unbroken cycle that connects each object to them, to their place on the planet, to you and to everyone they meet. Puzzles and storybooks, filled with imagery of exotic menageries, farm and woodland animals, intriguing objects, and antique curiosities, help them to daydream and discover. They can take a safari deep into their imagination, or learn something new about a favorite pet.

Moomah serves it up yummy and wholesome, for kids and grown-ups. Delicious pastries, fair trade coffee and teas, savory meals, snacks, sweet treats and finger food, all made from the finest natural ingredients and sourced from local and organic farms, delight the senses and encourage little ones to taste something new. And we’ll even show them how proud we are of them for trying.

At Moomah, art materials and projects illuminate universal themes: the five senses, the seasons, the animal kingdom, the body, mythical creatures. Your child is given the freedom to explore, to trust their impulses and admire the beauty of their expression. You learn the full sum of how their feelings and thoughts were brought to shape, and brought to life in their artwork. In this way, their artwork becomes the story of their emerging self and development, a document of that particular moment, and a treasured keepsake. You and your child can create a world filled with promise and possibility.


161 Hudson Street
New York, New York
1 0 0 1 3
212 226 0345
www.Moomah.Com
November 12th, 2010 — Arts and Crafts, Stationary
October 29th, 2010 — Advice, Arts and Crafts, Halloween

1. Select pumpkins that are vert fresh and firm. Avoid choosing a pumpkin that has bruised or soft areas or cuts or other visible blemishes.
2. Remember that warm weather and hot sunlight can speed decay in a pumpkin. If you live in a hot climate be sure to store your uncut pumpkins in a cool spot and wait to carve them until a day or two before Halloween.
3. Heat from electric lightbulbs and candles can also contribute to the early demise of a pumpkin. Try cutting a hole in the top of the pumpkin, allowing heat to escape.
4. Try Covering all cut edges of a pumpkin, as well as the entire interior, with petroleum jelly or vaseline. This will reduce moisture loss and keep a pumpkin looking fresh longer.
5. Or try soaking your pumpkin before and after carving in a bleach and water mixture to keep mold from growing.
6. Or try spraying carved pumpkins with acrylic finish spray. The spray is intended to seal the pumpkin flesh, preventing dehydration and acting as a barrier to mold growth.
7. The best known method I’ve heard is to spray/treat your carved pumpkin with ‘Pumpkin Fresh.’ This unique product has a breakthough formula that fights mold, rot and decay. Its biodegradeable and eco friendly. Available for purchase Here. - Taryn Cox for The Wife
October 28th, 2010 — Arts and Crafts, Halloween


For Directions on how to make your own do it yourself Pumpkin Glitter Candles Click Here
Images and Idea: Twig and Thistle
October 27th, 2010 — Arts and Crafts, Halloween, Thanksgiving


Image from: Twig and Thistle
September 1st, 2010 — Arts and Crafts, Kids
 Parents will love using this mini note set to create quick personal notes to tuck inside a child’s lunch. Includes 105 colorful cards for writing messages and 100 silly stickers for brightening up lunch sacks and sandwich baggies. Use them on days when your child has a test, when they need a pick-me-up, and just to say I love you. Mini Lunch Box Notes, $9.95.
www.PaperSource.Com
September 1st, 2010 — Arts and Crafts, Kids
 This set of No. 2 pencils from Paper Pastries is printed with a half dozen factoids that every good student should know: from “I before E except after C” and “Largest Mammal- Blue Whale”, Etc. Know it all Pencil Set, $10.00
www.paperpastries.bigcartel.com
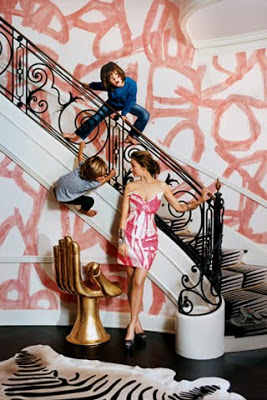
July 13th, 2010 — Arts and Crafts, Dress Up, Interior Design, Things I Love


Apolostered Silk Chair in Taroni Fabric.
I have gotten several emails from you darling Wives wondering about the gowns I create and curious to know where I get my silk fabric from. Well this post will be the answer to all of your curiosities….
Taroni silk out of Italy is the fabric I use for all of my sewing needs. Not only is Taroni one of the oldest silk companies, but is made exclusively in Italy using traditional and authentic techniques that no longer used. They have provided fabrics that masters such as: Hubert De Givenchy, Balenciaga, Yves Saint Laurent and Valentino used to create their haute couture collections. Also current designers of today like Albert Elbaz, Karl Lagerfeld and Nicolas Ghesquiere use Taroni silk in their present day collections.
Acquiring your own silk fabrics is easy whether it be for a sewing project or materials for upholstering furniture. Depending on if your ordering a light Georgette silk or a heavy double Duchesse silk, Printed silk or Plan, Prices range from $25.00 per yard to over $100.00 per yard. (For fabric orders over 10 yards the price per yard becomes lower.)
The future of Taroni is also working on developing products such as throws and pillows that will soon be available for purchase on their website. - Miss Taryn Cox

Dozens upon dozens of silk and color swatch variations that Taroni offers
www.Taroni.It
March 9th, 2010 — Arts and Crafts
February 9th, 2010 — Arts and Crafts, Valentine's Day
January 23rd, 2010 — Arts and Crafts, Kids
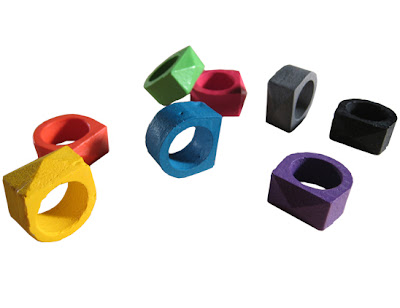
Crayon Rings by Timothy Liles
Set of 8, $50.00
January 22nd, 2010 — Activities, Arts and Crafts, Kids
Arts & Crafts
Paint, fold, and create with classic and innovative arts projects.
1. MAKE A BOOK: Choose from nine different styles, such as accordian, step book, and more, for you child to create his own book. Voila! A creative gift that everyone will love.
2. WRITE A STORY: Help your budding author create a story by filling a bag with 10 objects and using at least eight of them in the plot.
3. DRAW A SELF-PORTRAIT: Set your tot up in front of a mirror and have her sketch her self-portrait.
4. TRACE YOUR BODY: Tape nine pieces of blank paper together into a large rectangle, then have your child lie on top. Trace her body and have her decorate it with hair, clothes, and accessories.
5. DRAW YOUR FAMILY: Sketch pictures of each family member.
6. MAKE A FAMILY COLLAGE: Cut up old photographs to make a collage of the family.
7. MIX AND MATCH: Have one person draw heads, another draw bodies, and another draw legs. Cut them out and mix them up to make funny pictures.
8. GIANT TISSUE-PAPER FLOWERS: All that’s needed to make these impressive oversize blossoms are tissue paper and pipe cleaners.
9. GO GREEN: Kids can whip up these trash-to-treasure craftswith items that are already around the house.
10. CREATE CUSTOM KNAPSACKS: Personalize bags with fabric markers and stencils.
11. MAKE SHEEP: Create soft, fluffy sheep with construction paper, cotton balls, and googly eyes.
12. MAKE KEEPSAKE BOXES: Every kid needs a special box to store stuff. Use magazine photos to create a decoupage collage box.
13. CREATE A RAINBOW FISH: They love the book, now kids can make their own special, sparkling rainbow fish.
Continue reading →
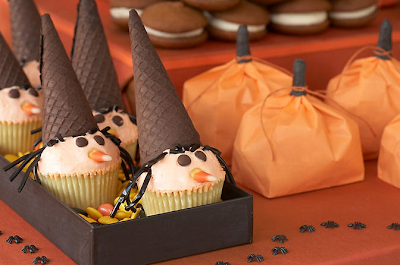
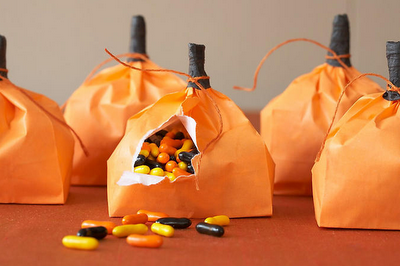
October 28th, 2009 — Arts and Crafts, Halloween
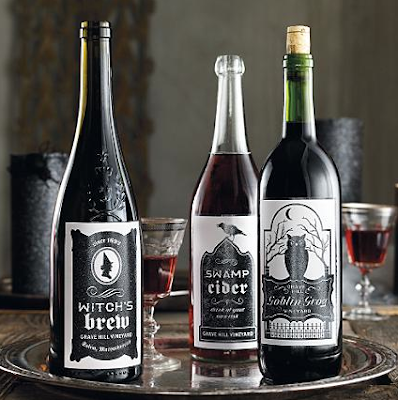
Witch’s Brew, Swap Cider and Goblin Grog
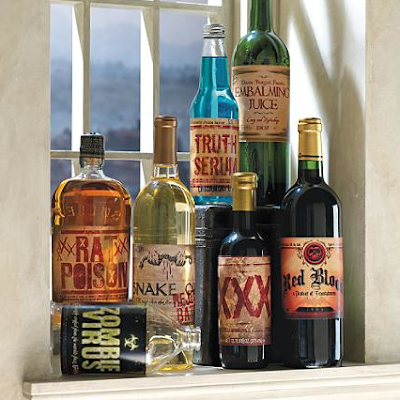
Embalming Juice, Truth Serum, Rat Poison, Snake Oil, Zombie Virus, and Red Blood

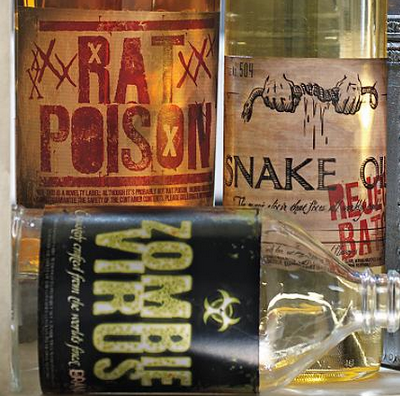
Wine Labels $12.00
October 28th, 2009 — Arts and Crafts, Halloween
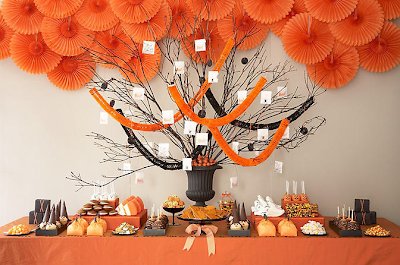
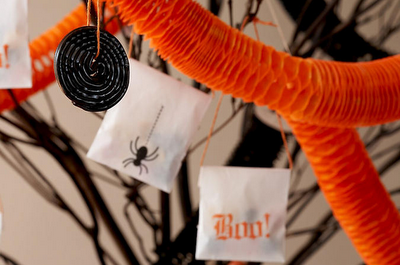
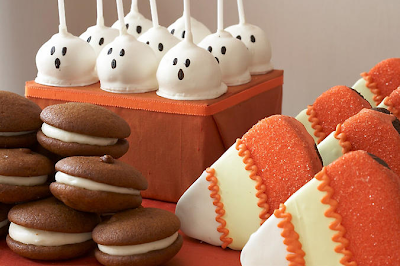
Party and Photos by Event Planner
www.AmyAtlas.Com
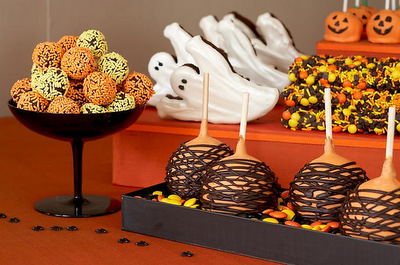
October 28th, 2009 — Arts and Crafts, Halloween
Ideas and Photos Compliments of : Martha Stewart Living
October 28th, 2009 — Arts and Crafts, Halloween
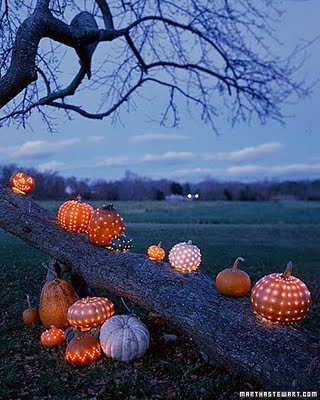
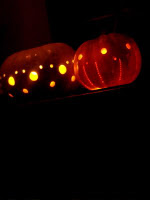
Add twinkle to your fall nights with these magical pumpkin lanterns. Instead of carving traditional faces, drill tiny holes into each pumpkin. Use strings of tiny white lights to illuminate the pumpkins, creating star-studded globes sure to delight any ghost or goblin.
Step 1
Turn a pumpkin on its side, and use a knife to carve out a circular opening in the bottom. Make the opening large enough so your hand can fit comfortably through it. Use a spoon to remove the flesh and seeds. With a serrated loop tool, scrape away the pumpkin’s inner wall until it’s about 1/4 inch thick. Turn the pumpkin right side up.
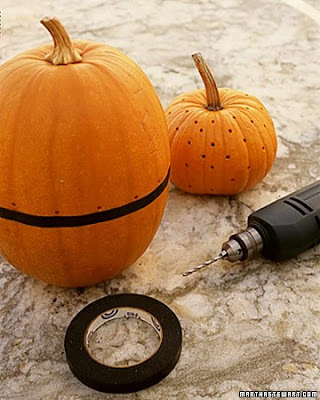
Step 2
Drill holes using a 1/4-inch bit; use tape as a guide for a uniform pattern, or make randomly spaced holes.
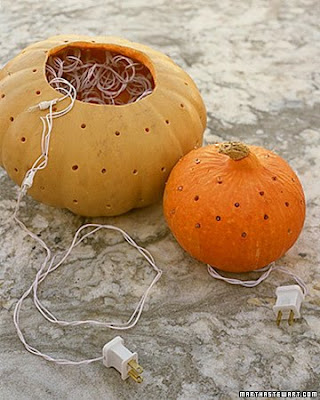
Step 3
Insert a string of lights through the bottom, and place one bulb in each hole, pushing the bulbs through so they protrude slightly. Tuck the remaining lights into the pumpkin, and turn the pumpkin right side up with the light string’s plug running out from the bottom. - Martha Stewart
October 28th, 2009 — Arts and Crafts, Halloween
To complete a front-door Halloween display, assemble a row of pumpkins, mimicking the twists of a slithering snake. The first and largest pumpkin forms the serpent’s head, and the rest make up its long, scaly body. Each “body” pumpkin is drilled with holes of various sizes, then lined up with the others so the snake curves and slithers. Christmas lights are strung through the line of pumpkins; these lights illuminate the carvings and are not a fire hazard. After dark, this glowing snake will light the path to your front door.
Tools and Materials
Pumpkins
Small utility saw
Large-bulb white Christmas lights
Plastic pumpkin-carving scoop, drill with borer tool and 3/4-inch and 1-inch bits
Felt-tip pen; utility knife
Extension cord
Pumpkin Snake How-To
Decide how long you want your pumpkin snake to be, and choose pumpkins in a variety of sizes, from large to small, to simulate the body of a snake. Choose a big, elongated pumpkin for the head.
Using the utility saw, cut a hole in the top and bottom of the first “body” pumpkin. One hole should be about fist-size, in order for you to reach your hand in and remove the seeds, and the other just big enough for a string of lights to pass through.
Hollow out the insides of the pumpkin with the scoop.
Drill a series of holes into the sides of the pumpkin, varying the size of the bits. When drilling the larger holes, you don’t have to puncture all the way through the flesh; the light will glow through partly drilled holes. Repeat with all pumpkins except for the head.
Set the pumpkin head on its side, so that the elongated shape can form the jaw of the snake. Draw a serpent face with long fangs around the stem of the pumpkin (which you should remove when you cut out the mouth), using a felt-tip marker. Cut out the eyes and mouth with the small saw. With a fine-tip utility knife, carve out other snake features, such as nostrils.
Once you have cleaned and drilled all your pumpkins, arrange them in a snaking line.
Starting with the head (which should be farthest from the house), pass the string of lights through the holes at each end of the pumpkins (the larger pumpkins may require two to three lights; the smaller pumpkins near the tail, just one). You may need an extension cord to reach an electrical outlet. - Martha Stewart
October 27th, 2009 — Arts and Crafts, Halloween
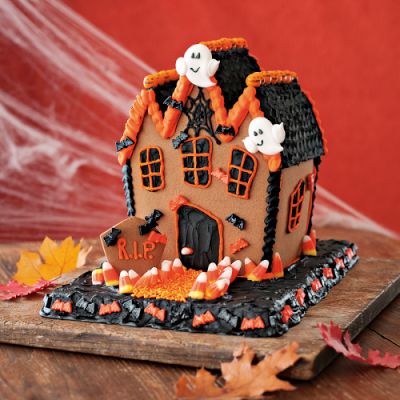
What a Fun way to spend time with your kids and make a yummy Halloween treat. So skip the standard Christmas ginger bread house and Make a spooky Haunted House this year. No Baking Involved.. So its quick and easy!
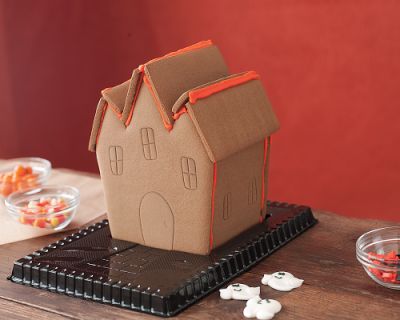
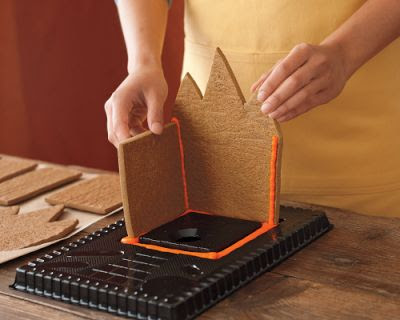
Available at William Sonoma Stores.
May 3rd, 2009 — Arts and Crafts, Mothers Day
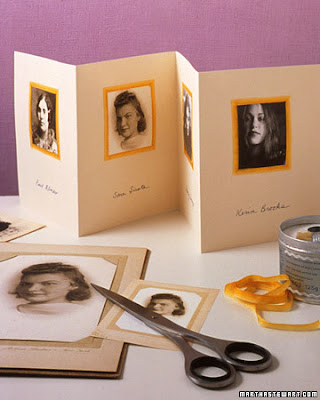
Family-Tree Photo Cards
A handmade card with photographs depicting different generations shows that the things mothers and daughters have in common transcend the passing styles of the times
January 21st, 2009 — Arts and Crafts, Domestic Goddess, Gifts

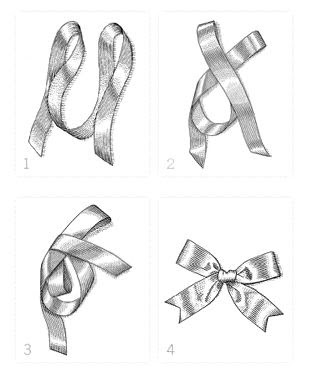
How to Tie the Perfect Bow…
A good wife uses fabric ribbon when wrapping gifts for loved ones. It makes for much better presentation, Looking classic and elegant. I find Synthetic Ribbon doesn’t lay right and looks Tacky and Cheap. And when your done don’t Forget to clip the Ends in an upside down V shape. (Like in Image 4.) And Most of all practice maked perfect… So don’t get discouraged, Keep at it.
For fabric ribbon try:
The Paper Source
Joann’s
October 26th, 2008 — Arts and Crafts, Halloween
October 19th, 2008 — Arts and Crafts, Halloween

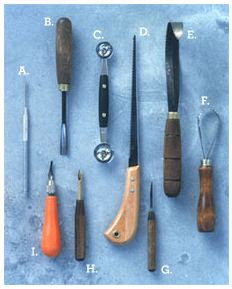
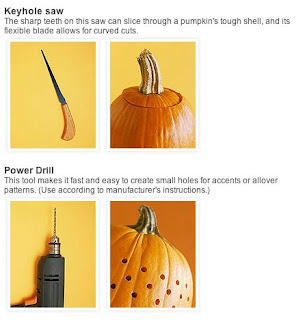
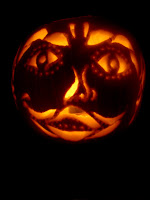
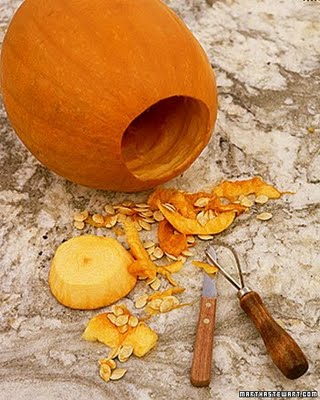
The first step is hollowing out the pumpkin. Use a keyhole saw to cut the hole. If you’ll be using a candle for illumination, you can cut the hole in the pumpkin’s top (always put the candle in a high-sided glass, and never leave unattended). For electric lights, make the hole in the bottom or side so you can hide the cord.

Scoop out flesh, pulp, and seeds with a plaster scraper or fleshing tool.

Now it’s time to transfer your selected designs (use one of our pumpkin templates or draw your own). Affix it to the pumpkin, and trace the design by poking holes with a sharp awl, needle tool, or T-pin.

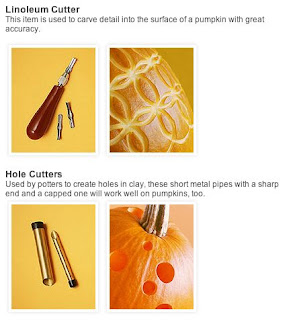
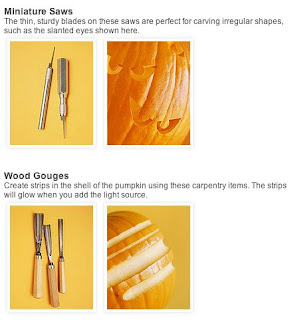
Remove the template and carve along the pattern with a miniature saw or linoleum carving tool. If you want to make holes in the pumpkin for eyes, use a drill equipped with a 1/2-inch or 3/4-inch spade bit.
You can also get creative with patterns and designs using these pumpkin-carving tools.

If desired, place candles, small flashlights, or battery-operated light sources inside your pumpkin.
Tip: Prevent exposed areas of the pumpkin’s flesh from turning brown by applying a film of Vaseline.
To illuminate a carved pumpkin, string lights are preferable to candles for most designs: Wrap a strand of 20 lights around a glass jar, and secure wires with tape. Cut a hole in the hollowed-out pumpkin for the cord, and place jar inside. Unplug lights before leaving the house or going to sleep. If using a candle, place it in a glass or votive holder, and cut a hole in the back of the pumpkin for ventilation (or leave the top off). Battery-operated candles are another good alternative.
From Martha Stewart Living